Showing posts with label winter. Show all posts

Saturday, February 18, 2012

On Pizza Cravings

Oh pizza. PIZZA. You're such a temptress, pizza.

I've been through them all - the crazy chemical miracles that are on the market to help those of us aspiring to be vegan to calm our cravings. But there's the aftertastes - the freaky textures - the plastic-coated tongue - nothing does it for me. The only thing that takes a little of the edge off? Cashew cheese.


I know I've harped on the stuff before, many a time, but you guys should know - my love doth not lessen. CC hits all the importants - crisps under the broiler, has the all important indulgent, fatty flavor and texture, and it's extremely customizable. Making a tex-mex pie? Stick half a jalapeno, a handful of cilantro, and use lime juice rather than lemon for tang whislt pureeing the nuts.

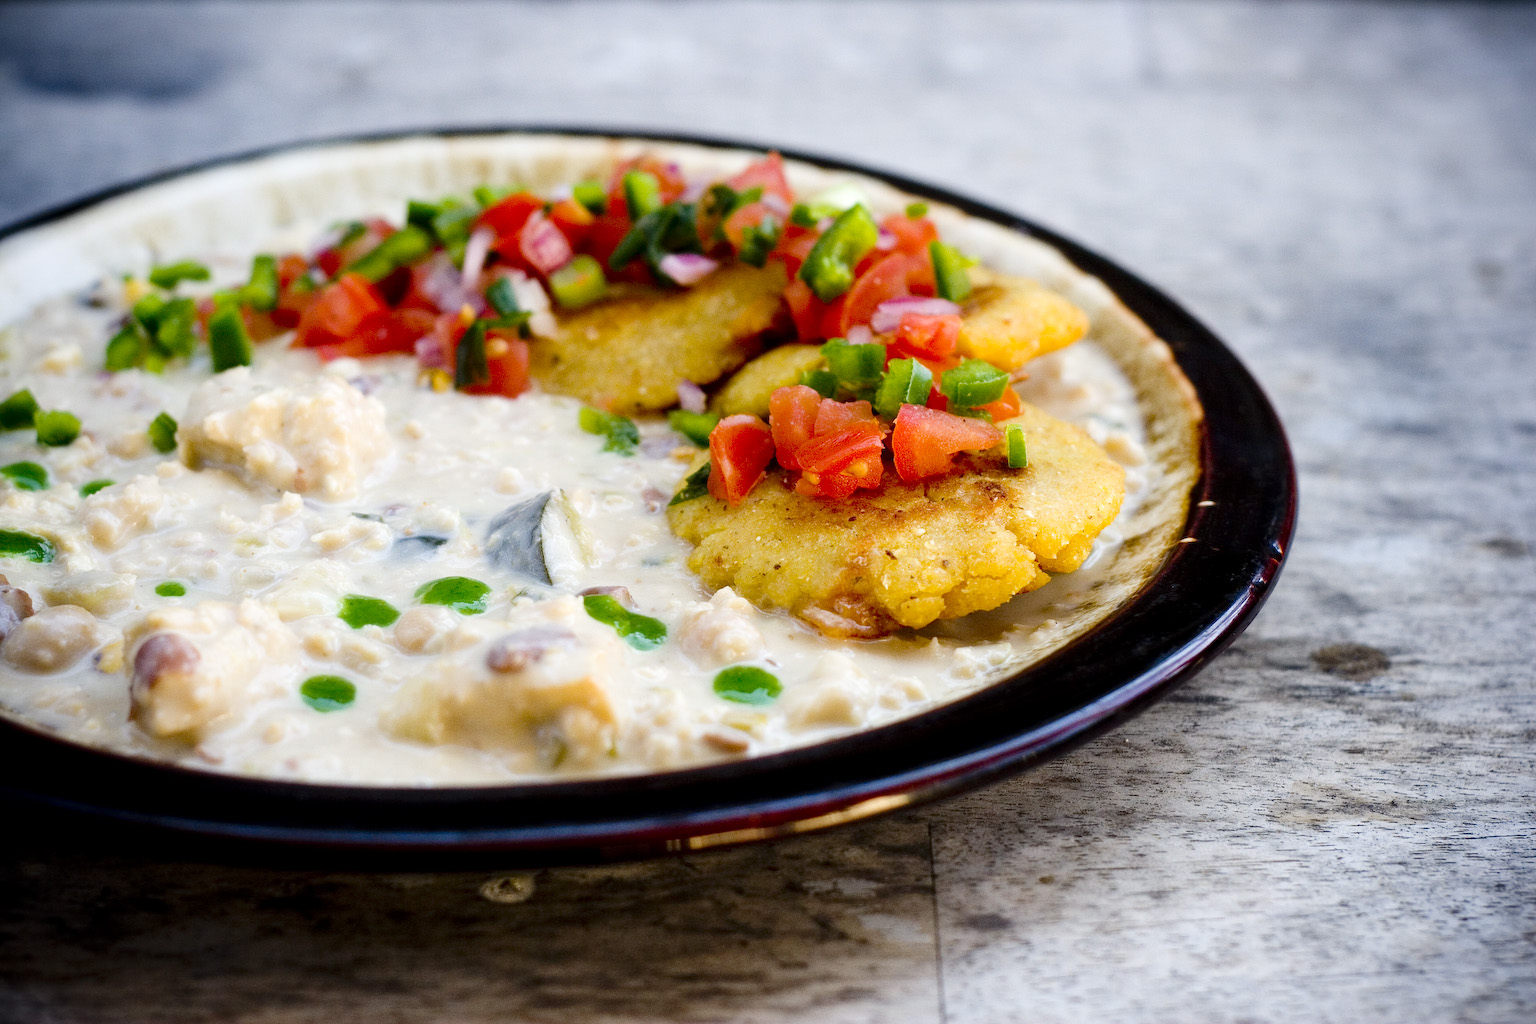
The above pie? Buffalo mushroom with carrots, celery, roasted tomato, topped with jalapeno/parsley puree. HOT POTATO and extremely delish. Details below.


Buffalo Mushroom Pizza

serves 2

For pie:
1 batch pizza dough (gluten-free crusts work wonderfully here my dears - here's one to try)
6 ounces sliced Crimini mushrooms tossed with 4 tablespoons Frank's Red Hot sauce
4 small Roma tomatoes, sliced
1 large carrot, peeled, diced
2 medium ribs celery, chopped
1 cup freshly made Cashew Cheese, extra-garlicy

For puree:
3 tablespoons freshly minced parsley
2 scallions, minced
1 small jalapeno, stemmed, unseeded (I like the spicy.)
1/2 tsp sea salt
Just enough water to process

Gotta make that delish cheese first. Here's how:

Soak 2/3 cup raw cashews in hot water, just enough to cover, for 20 minutes. Drain half the water off and toss them into the blender, along with the juice of one lemon, 2 tablespoons nutritional yeast, 1 teaspoon salt, 3 cloves garlic (minced) and pulse until the cashews start to break down. You'll most likely need to get a scraper out to help the puree process along. Chunky texture is good - but not too chunky. If your cheese ends up a little wet - transfer to a small baking sheet and bake in a 350f oven for 10-15, scraping often, until it dries out a bit.

Meanwhile, roast your tomatoes and mushrooms: toss the sliced Romas with a little olive oil, lay out on a baking sheet, and throw them in a 400f oven for 20 minutes or so. Just enough to char them a tiny bit, and dry them out. Same with the mushrooms - you want them to release a little liquid and absorb your hot sauce. Remove veggies and turn the heat to 450f.

Roll or throw your pizza dough into a 12-14 inch round. Brush it with olive oil.

Spread a good heaping tablespoon of cheese over the dough, spreading with a spoon or your fingers. This is the glue layer - it'll help keep your toppings on your pizza. Lay the tomatoes over the pie, attempting not to overlap. Then scatter carrots and celery. Then mushrooms. Now, with your fingers, grab half-handfuls of cashew cheese and gently "throw" it at your pizza, covering the pie as evenly as possible. I love this technique as it allows the cheese to make peaks that brown very nicely as the pie bakes.

Toss that sucker in your preheated oven and bake 10-12, until crust is golden brown and the cashew cheese is starting to toast.

While the pie is baking, rinse your blender out and make the jalapeno puree - add all ingredients to your blender and whirr until combined, adding just enough water to make things go smoothly.

Remove pizza from oven. Transfer puree to a squirt bottle. Drizzle pizza with puree, slice, and serve.


Enjoy, my dears!

Saturday, January 21, 2012

Masala Mushroom Loaf. Yowza.

Tired of the same ol' same ol' mushroom loaves? Thyme for something new? In need of some sage advice?

Try this spicy sweet number on: mushrooms, yes, and some tofu - but minced chilis, sweet peas, curry leaves, and good, toasty Garam Masala kill the Fall Flavor Set and make room for Spring. In the middle of February. Yes plz.


I LOOOOVE the parchment paper trick when making vegetable loaves - the lovely browned crust the oven's worked so hard to make comes out in one piece, every time. Just cool for 20 minutes, invert over a platter, and there it is, ready for slicing.


Its the perfect opportunity to play with inclusions, but remember - greenery roasts to brown, so use vegetation with color. Small red pepper flowers work well. Green peas, carrots, and beets work too. Enoki mushrooms keep a light brown shade, so you can laminate your own little 70's Forest Scene on top of your next loaf, if you'd like, as long as you lightly coat your parchment with oil - otherwise, your lovely lamination might stick. And we can't have that!


Masala Mushroom Loaf
serves 4-6


1 tablespoon olive oil
12 small or 8 medium crimini mushrooms, minced
1/2 small red onion, minced
1/2 red pepper, minced
1 bird's eye chili, minced

1.5 tablespoons garam masala

7 ozs extra firm tofu, well drained, crumbled
8 dried curry leaves, crushed
2 tsp brown sugar
2/3 cup raw cashew pieces

2 tablespoons melted EB
1 tablespoon nutritional yeast
1 tablespoon flax meal
1 medium white potato, baked until soft, mashed (or 2/3 cup mashed potato)
1/2 tsp turmeric
1/2 tsp asofoetida

1 tsp fennel seeds
1 tablespoon sea salt


Loaf pan
1 sheet parchment paper
Canola oil, to coat


Preheat the oven to 350f. Cut a piece of parchment paper to fit the loaf pan, sides included. Cut slits in the corner so it will fold flat to the pan's form. Spray a little oil on the bare metal before fitting the parchment inside - it'll help it stay in place.


Reserve a few pieces of red pepper for garnish. In a dry skillet or saute pan, toast the garam masala for 2-3 minutes, until very fragrant. Set aside.


Heat the olive oil in the same skillet and add pepper and onion. Cook 5 minutes, until pepper softens and onion is translucent. Add mushrooms and cook, stirring often, for 6-8 minutes, until mushrooms have released their liquid and almost all of it, but not quite, has steamed off.


Remove sauteed veggies to a heatproof bowl.


In a food processor, pulse cashews until they're the texture of large polenta - not powdery, with some chunks still there. Add to warm vegetables. Mix in remaining ingredients and taste for salt - add a teeny bit if need be. The mixture should be relatively dry, but not crumbly - add a little more Earth Balance or even a titch of water if it needs it.


Cut small triangles out of two or three sides of a piece of red pepper with a paring knife. Repeat for as many "flowers" as you'd like.

Arrange red peppers and a stem or two of cilantro on the bottom of the loaf pan, and press 1/2 a cup of the mushroom masala mixture over top, pressing down to keep things stuck in place. Add remaining loaf mixture, pressing down firmly, and flattening top with wet hands once the mix is used up.

Bake for 50 minutes covered, then another 15-20 uncovered, until loaf is browned on top and firm-ish to the touch. Let rest 20 minutes, invert onto a platter, and serve. I'll share the apple-lentil gravy we noshed ours with next week - it was pretty killer.

Cheers!

Sunday, March 6, 2011

I love yooo, Soondobuuuu.

I'm going to tell you guys a secret.

I drink pickle juice.

I know, I know. Not healthy. And only occasionally. And I'm even snobby about it - my fav is the water that surrounds properly fermented sour dill pickles. Nerdy, yup.

So when a pal o' mine described to me one of her "I miss Cali" dishes, and how it was kinda pickle soup, I knew I had to either find it somewhere in town or make it myself. And since we're only just starting to see Korean joints pop up in CLT, the latter had to do. She linked me this place - and I went to town.


OMG, baby kimchoy!! Or Bokchi? Hmm. Anyways - a week of fermenting baby bok choy in a shrimp-free Chi recipe produced stinky, wilty, and dare I say, cute results. Little pockets of pickly, spicy awesomeness. They're kind of a mouthful - if you prefer your kimchi more dispersed throughout the brew, chop them a bit before adding.


Traditionally, this stew is made over an open flame in a clay pot, with everything going in fresh and cooking in stages, ending up as one big bowl of tofu, veggies, kimchi, pepper powder or paste, broth, and a big ol' egg cracked in at the very end. Insane. Spicy. Textural. Awesome. I was a tad dubious about my Japanese porcelain holding up to the heat, so I cheated and made the stew in a pot and ladled it into by bowl of choice. I love this dish, and will have to hunt down a proper Ttukbaegi. I'll bet Super G has one hidden somewhere in that vast, stinky space.


Soondubu jjigae with Kimchi
(aka KimChoy stew with Tofu, Veggies, and eggs)
serves 2.


For the broth:
3 cups - use either homemade veggie stock or, like me, faux-beef boullion + water (mushroom would be awesome too)
1 piece kombu
2 bird's eye chilis, split down the middle
Dash sesame oil
3 shitakes, chopped
1/2 onion, chopped


For the rest:
1 cup kimchi
1 tube soondubu
Green onions, chopped
Cilantro, chopped (optional)
1 large egg
3 tablespoons (or more to taste - you know me and tongue-searing, I used more like 5) Korean red pepper paste (like this)

Easy peasy. Heat your oil over medium heat either in your Ttukbaegi or small soup pot and saute onion and mushrooms for 3-4 minutes, until softened. Add remaining ingredients and simmer 10 minutes, until flavors have melded. Remove kombu.

Now, add your pepper paste, herbs, and kimchi, and stir well. Carefully break your tofu into the pot, piecing it up a tad bit, but leaving some large chunks. While soup is still simmering, crack the egg in. Now, you can either stir it in and enrich your stew or let it poach a bit. I chose the former.


One of the rad things about the afore-mention Super G mart we've just recently been blessed with is that they have TONS of banchan. I love lotus root, so I picked up some sesame-soy marinated root to float in my bowl amidst all the salty, spicy awesome.

Serve with banchan and rice. Soooo goooood.

Wednesday, March 2, 2011

This is how I like it, anyway.

Isn't that the translation? Okonomiyake = "as you like it" in Japanese?

I immediately considered putting tater tots in mine, but settled for slightly-less-evil Bacos instead. Yeah.


I'd wanted to try my hand at this since seeing Closet Cooking's Shitake Okono take the cake for a Tastespotting recipe contest. Plus, my wok is the perfect size for personal-Japanese-pizzas. AND! Little Sis let it be known that this is her fav food, so I had to practice for some future birthday surprise.

Kevin has another recipe on his site that uses whole wheat flour - which worked out swimmingly and added an oaty, grainy flavor.


The traditional recipe calls for Dashi - made most often with fish, so I went with an imported mushroom broth. Steeped with a little kombu, it had a briney, hint of the sea taste. Perfecto. And since I'm a hot toddie about spicy, I mixed some prepared wasabi with the Mayo before spider-webbing our 'cakes. And covered them with toasted sesame chili oil. So many flavors. So lovely.

Baco Okonomiyaki
adapted from Closet Cooking's awesome recipe
makes two pancakes

2 eggs, well beaten
1/2 cup whole wheat flour
1/2 small head of cabbage, sliced thin
1/2 cup bacos
1/2 cup broth steeped with one small piece of kombu - for the broth, I used a Japanese mushroom-flavored
Handful of fresh bean sprouts
Handful of frozen edamame
2 cloves garlic, minced
1/2 pound shitake mushrooms, stems removed
1 tablespoon soy sauce, or more to taste (whole wheat flour has a sweet undertone - you might want to add a tad more sauce if you likey the salty)
Oil to coat your skillet or wok

To top:

Fried shallots (find these at your Viet/Thai grocery)
Pea shoots (lurv ya TJS!!!)
Chili oil
1/2 cup Katsu sauce
1/2 cup Mayonnaise, preferably Japanese, mixed with 1 tsp wasabi powder

Let's do this.

First, you'll need to saute your cabbage and mushrooms. Heat a tablespoon of sesame oil in a wok, and add your cabbage. Sear them on one side till a tad brown, about 5 minutes. Add 1 tablespoon of soy sauce and a little water and cover your wok, letting the cabbage steam - let it cook 3-4 minutes, until soft. Set aside.

Slice your mushrooms into strips and heat another tablespoon of sesame oil in your wok. Add shrooms and cook over medium heat, until they soften. Shitakes are little sponges, so I couldn't resist adding a little leftover mushroom broth to them just as they were finished cooking - to pump that awesome, earthy flavor. Set aside.

In a large bowl, mix your eggs and broth. Add flour and whisk. You want a thin pancake-batter like consistency - adjust if needed. Add all of your veggies, garlic, bacos, soy sauce, edamame, and mix well.

Heat a tablespoon and a half of sesame, olive or veggie oil in your wok until it shimmers. Quickly spoon a large ladleful of batter into the wok's bottom, using the back of the ladle to spread the batter into an evenly-flat circle. Let it cook 4-5 minutes a side - it'll brown nicely. Grab the biggest spatula you have and carefully flip the pancake. Cook another 3-4 minutes, until firmly set. Repeat with pancake 2.


You know I just put the mayo mix and the katsu sauce in a ziplock and cut a little hole to get that tubing action. You might have actual bottles. If so, cheers! Either way, carefully draw a spiral with katsu, then mayo, around the pancake. Use a chopstick to drag lines through the pattern. Preeeeeety. Top with chili oil, shallots, anything you'd like. Thinly sliced nori would have been awesome but Erk's a seaweed hater, so we left it as-is.

Cut into 6 slices and serve. Awesome.

I'm getting back into peanut-butter love, so we ate a simple peanut/sesame/udon salad as a side. It was almost as good as the 'cake - seriously, I love this stuff. For my gluten-free homies out there - try it with brown rice spaghetti. Works perfectly.


Peanut Butter/Sesame Udon Salad
makes 3-4 servings

1/2 cup creamy peanut butter
1/2 cup warm water
1/4 cup soy sauce
1 tablespoon minced ginger
4 garlic cloves
1 tablespoon agave nectar
Dash rice vinegar 


8 ozs Udon or Soba noodles, prepared al dente


1 cup sliced fresh veggies - I used a small roma tomato and 1/3 of an english cuke
Small handful sprouts
1 tablespoon each black and white sesame seeds, to top
Thin sliced red onion, to top 
Crushed red pepper to top - if you like the spicy.

Prepare your noodles according to package directions, rinse with cold water, and set in the fridge or freezer to chill.

Puree all the sauce ingredients in your blender for a minute or two, till totally uniform.

Toss your sliced veggies and sprouts with your noodles, add sauce, and wrastle that dressing into every nook and cranny. I admit - I gave up on my tongs and used my paws. It's a heavy salad.

Put a handful onto a small plate, top with sesame seeds, thinly sliced onion, and crushed pepper. 


Eat and be merry. Love!

Saturday, February 19, 2011

Beyond Butterdome - Twice Baked Potato Pie

Ya'll know I love me the healthy eats, but sometimes, you gotta put some butter in there. And sometimes Some is The Entire Stick.

I've had my share of twice baked 'taters - as a kid, I ate tons of the frozen ones (were they Ore Ida? Don't remember). I've had the casserole once or twice - and thought it so un-textural that it was kinda weird. Like eating sauce with nothing under it. Not in a good way.

So instead of wasting all of those fibrous, tasty, browned skins, I chopped 'em fine, seasoned 'em, and turned them into a crust, sort of. There aren't a lot of things going for 'taters nutritionally, but whatever they have is in them skins, so eating them's a good idea, especially if you're eating a half-stick of butter in addition. And cheese. And cream. Oh boy.


Twice Baked Potato Pie

4 pounds Yukon Gold potatoes, washed, pricked all over with a fork
1 stick butter 
1 cup sharp cheddar, smoked gouda, whatever cheese you prefer, grated
1 cup sour cream
1 egg, beaten
1/2 cup whole milk or cream
Salt and white pepper to taste
2 cloves garlic, minced
1 tsp each dried parsley, chives
Dash onion and garlic powder
Butter, for the casserole 

a 13 x 9 baking pan, or 9 x 9 x 4 deep baking dish

Just looking at that list of ingredients makes me wince, but let's do this.

Preheat the oven to 350f. Depending on the size of your taters, bake for 1:15 - 1:30, until they're soft when poked. Cool 15 minutes.

Slice them in half, and using a spoon, scoop the flesh into a bowl. Add butter, sour cream, cheese, milk, salt and pepper and garlic, and mash well. You want them soft, airy, so don't over mash, and add a little water if you feel they're too thick. Using an electric beater, whip them for a couple minutes to aerate. Fold in your egg and set aside.

Butter your casserole dish.

Mince the potato skins well, and add the dried herbs and onion and garlic powders. Salt them a teeny bit and press them into the bottom of the casserole, making a crust.

Spoon the mashed potato mix over the potato skins, smoothing the top with a spatula. Bake for an hour, or until the middle has puffed and there's brown in spots.


Serve with sauteed Bok Choy or another light side. If you make the 'role ahead, you can slice it into squares and reheat gently for an Hors d'œuvre. Delish.

Wednesday, February 16, 2011

If you love 'em, feed 'em.

A repetitive theme in my life - feeding people I like. They don't even have to be friends. If there's pal potential, I'm bringing a plate of deviled eggs. Or making something ridic with seitan. Or putting the Cocktail Kit in the car.

I think this all started with Food Not Bombs, back in the day - 5 or 6 of us piling into some tiny kitchen, making a huge pot of veggie chili out of donated materials, taking it to a park to feed the Anonymous Hungry. Did we eat more of it than they did? Probably. But still, that desire to feed whoever was around and cool, this is perhaps where it started for me.

So surely, on V day, I had a plan - we were gonna eat something a little more complex than the meh SFLA fare we'd been noshing all weekend (oh nachos with Cheez Whiz, I'm still remembering you with disgust). I wanted some gnocchi, some sharp garlic tang, some tofu. And so we ate all three - Stuffed Tofu Parmesan, Ricotta Gnocchi, and this simple ditty I call Bruschetta Sauce - tomatoes, tons tons tons of garlic, spinach, agua. Vamanos.


Opulence, in food, for moi, often comes down to bounty - how many different vegetables are involved with the dish? The more the better, so says I. And the more disparate the preps, the more fun the consumption becomes.

So there's at least 5, 6 if you count the half-bushel of Parsley involved in this mess. Glorious veggies, will you be my Valentines?


The tofu was a take off on this recipe - the dirty-fi-cation of Soy Cake - only I added lots of parm to the breading mix, and dredged the stuffed cakes in flour, then egg first. I'd used a paring knife to slice pockets, carefully stuffing them with soy sausage, chopped, dried mushrooms, and asiago cheese, after marinating the 'Fu in a teeny bit of smoked salt, water, and sesame oil. You can bake these or fry them - frying is quicker by about 20 minutes, so that's what I did, keeping them warm in the oven while the Gnocchi came together.

This recipe is good, but basic - add herbs, truffle oil, garlic, stinky cheese, whatever you need to pump the flavors a bit. Nutmeg is optional IMHO - such a bright flavor, it pairs oddly with garlic, so I left it out this time. I had a hunk of gradually-hydrating Tomato Powder (even though it's been kept in a sealed ziploc, the stuff is still a Mars-looking red rock at this point) that I grated a bit over each ricotta cloud before plating. Looked cool.


But let's be honest. Mostly, this meal was an excuse to make Garlic Monkey Bread.


Erik's Ma pulls out this King Arthur kit on Saturday and goes to town with a mixer and a bundt pan and out comes the best thing we ate all weekend - Pecan and Brown Sugar Monkey Bread. Awesome, gooey, sugarbomb, butterbomb, memorable. And my little cheese-obsessed brain immediately says, "Ooooooh, I've got to try this with garlic and Parm".

So we did, and it was awesome. Better than your fav garlic rolls. Better than MY fav garlic rolls. Warm, crusty, chewy, messy, good-god-I-could-eat-this-whole-thingy.


(You're probably wondering how I kept my hands off for 10 minutes to take these shots, amirite? Well let me tell you. It tried the very depths of my soul's patience. And I popped it back in the oven for 5 before noshing)

Garlic, Parsley and Parmesan Monkey Bread

1 pkg active dry yeast
1 tsp sugar
2 cups bread flour
1 cup all-purpose flour
1 tablespoon salt

2/3 cup parmesan cheese, grated
3 tablespoons freshly minced parsley
Black pepper, tons
Scallions, 4, minced (optional)
10 cloves garlic, crushed, minced

1/4 cup butter (oh ya.)

A bundt pan - mine was 2.8 liters (which I ran out and randomly purchased from this awesome little store), but this recipe is a little flexible - a smaller pan will produce a taller loaf.


Let's do this.

In your stand mixer bowl, pour one cup warm water. Add your yeast and mix. After a minute or two, add your sugar and mix well - let stand 5 minutes.

Add salt, then while mixing, gradually add your flours. Use a scraper to push the mass into the bread hooks and let it run 5-6 minutes, until a firmish dough has formed. Let the dough stand for 15 minutes, then knead another 2-3 minutes, until the dough's "skin" is slightly shiny. Remove to an oiled bowl, cover, and let your dough rise for an hour.

Mix cheese, herbs, salt and pepper in a small bowl. Melt your butter in a small saucepan and set aside.

Preheat the oven to 400f.

Turn out your dough onto a very lightly floured board and cut into 1 1/2 inch squares using a sharp knife. I ended up with about 25 pieces. Roll them in your palm, dip into the butter, then dip into the cheese mix, rubbing the mix around the entire piece. Place in your buttered bundt pan. Continue until your dough has been used up, filling the pan evenly and flatly.

Let the dough rise another 15-20 minutes, until about doubled. Bake for 30-35 minutes, until the top of the bread is browning.

Now, I had to carefully use a spoon to separate some of the bread from the pan before turning out - the cheese stuck a teeny bit. Do so if you aren't using non stick. Then grab a large plate, put it over your pan, and flip the whole mess over, tapping the bundt pan to release.


Great googly mooglies, was this good. Dipping sauce (which for us was leftover bruschetta sauce, but standard red would be awesome as well) is essential. Enjoy!

Wednesday, February 9, 2011

Dunno how I feel about White Chili, but here we go.

Hey, I like creamy, saturated-befatted foods as much as the next, but for chili... it seems odd. Which is hilarious, since I've been known to spoon copious amounts of sour cream atop a bowl of steaming red.

But since I cook for the lovely ladies of Huntersville, and someone had a craving, I did the deed - White Chili with Tofu and Pinto Beans, and it was pretty interesting.


Since this was such a brothy, creamy bowl, I'd thrown together some faux-Pusas to balance it out a bit - kind of like a South of the Border Biscuits n Gravy plate. It was much improved - the soft corn and bite of tomato balanced the jack-cheese-creaminess. Were I to do this chili again, I'd totally try a Mex-themed spoonbread, perhaps, as well.


White Chili with Tofu and Pintos

1 large onion, chopped
10 cloves garlic, minced
1 green pepper, diced
1 calabaza squash, cut to triangles
1 carrot, peeled and diced
2 stalks celery, diced
Handful of mushrooms
1/2 stick unsalted butter
3 tablespoons corn starch
1/2 pound Pepper Jack cheese, grated
6 cups water mixed
1/3 cup nutritional yeast
1 tablespoon scallion, chopped
1 small handful cilantro, chopped
2 cans pinto beans, drained and rinsed
1/2 block firm tofu, torn to bite sized pieces
1 cup TVP
1 cup frozen corn
1 cup half n half
Salt and pepper to taste
Dash cumin
1 tsp habanero powder or cayenne (for ze spice!), more to taste
Dash sugar
1 small can hatch chilis (TJ's has this covered - look in the spice section)
1 small container sour cream

Melt the butter in a stock pot and add onion, garlic, pepper, carrot and celery. Saute until onion is translucent, 4 minutes. Add zucchini and mushrooms, toss, and cook another 3 minutes.

Add water, nutritional yeast, beans, cumin and habanero, herbs, chilis, TVP, salt, and sugar - stir well and simmer 20 minutes, until all veggies have softened. At this point, add your tofu - I fried mine in a little vegetable oil and drained it before tossing it in the pot for texture, but either way works just fine.

Remove the pot from the heat. Add the frozen corn. Toss your cheese with the cornstarch. Add in handfuls at a time and stir to melt. Ladle a small bit of broth into a measuring cup and mix your sour cream into it until well-blended, then pour into the pot. Add half and half a little at a time until the chili is the right consistency and taste for salt and heat.


Garnish with cilantro and chopped jalapeno, or with fresh salsa. Serve with papusas or corn bread, if you'd like.

Friday, February 4, 2011

Chilaquile Pie - awesome with Mole Tofu.

A cross between Tortilla Pie and Quiche, this combination of corn tortillas, eggs, queso fresco and assorted veggies is soft, make-aheadable, and delicately tasty. I had a serious Mole craving this week and this was the perfecto side to all that rich, chocolately sauce. Try it as a brunch side with scrambled eggs! Or even go nuts and stick a fried egg on top (or in between layers, ooooooh)!


Chilaquile Pie

20 corn tortillas, soft taco size
4 eggs
1/2 cup sour cream
1/4 cup milk
Salt and pepper
1/2 pound queso fresco, sliced thin
1 poblano pepper, roasted, peeled, sliced
1 zucchini, slced to rounds
2 cloves garlic
6 leaves epazote, minced
Parsley and chives, 1 tablespoon each, minced

Preheat oven to 375f.

In a skillet, saute your garlic, epazote, parsley and chives in 2 tablespoons olive oil and lay the zucchini in the pan in a single layer. Press them down with a spatula, cover, and sear over high heat 2 minutes. Flip and get the other side. Remove to plate to cool.

Grease a 9 x 4 inch loaf pan or baking pan. Tear your tortillas into triangles. On the bottom, layer 12-14 pieces of tortilla in a complete layer - scatter poblano pepper over. Layer more tortilla pieces, then the queso fresco in a single layer. More tortilla pieces, then the zucchini. Use up your tortillas for the top layer.

Whisk or blend eggs, sour cream, salt, milk, and pepper in a bowl and carefully, slowly pour over the casserole, letting the mix trickle through the layers. Let sit 20 minutes to absorb a tad bit.


Bake for 30-40 minutes, until center has puffed. Cool.

We noshed our CP with Tofu Mole - fried blocks of marinated tofu stuffed with roasted Pepitas, a little queso, and diced mushrooms, atop a ladleful of this well-loved mole recipe. A little sour cream on top of the Chilaquile Pie was the finishing touch - a filling, delicious meal.

Saturday, January 22, 2011

Sick Hubby Soup

More soup? More soup.


This is one of the first things I "came up with", not that it's a particularly adventurous recipe, but anyways - probably in January or February, when it got cold and damp in the city and either one or both of us caught something nasty. I've since gotten a tad bored of it, but this is what Erk wants whenever he's sniffly, which he was this past week. With toast and EarthBalance, he goes through quarts of it!

I also used to drop 3 bucks worth of faux-chicken bouillon cubes into an 8-serving pot, which frustrated me, so the recipe below contains my approximation of this brand. Tastes very similar and is much, much cheaper. Yay!

Sick Hubby Soup
makes 8 - 10 servings, or enough to fill a small dutch oven

3 medium carrots, peeled and diced
3 medium stalks of celery, diced
4 scallions, minced, white and green parts
1/2 handful fresh parsley, minced, or 1 tablespoon, dried
2 cloves garlic, minced
1 tsp white pepper
1/2 block extra firm tofu, diced (you could instead stir 2 eggs in during the last 5 minutes of simmering if you'd rather not eat ze soy)
1 1/2 cup small noodles like ABCs, Crushed Fideos, Ditalini
8 cups water
3 tablespoons nutritional yeast
1 tsp brown sugar or palm sugar (something with a deep flavor)
2 tablespoons sea salt, or to taste
2 tablespoons olive oil
1/2 cup frozen peas

Easy peasy. Heat your oil in a soup pot or dutch oven and saute carrots and celery until carrots soften a bit, about 6 minutes. Add scallions and garlic, cook two minutes more. Add water, salt, garlic, herbs, nutritional yeast, sugar and pepper - simmer 4 minutes until the yeast has completely dissolved and mellowed. Add your tofu and noodles and cook 4-6 minutes if eating immediately, 2 if making ahead (let the noodles finish cooking in the pot on the stove on their own - it's easy to turn them to mush if you aren't careful!). Add the peas at the end.


Serve with toast and orange juice. Good for what ails ya!

Wednesday, January 19, 2011

Minestrone with Parmesan Dumplings

Another belly warmer, this. I'm moving from wonton obsession to dumpling obsession, thanks to a meal at Zum Schneider whilst up in NYC last weekend, and by meal, I mean single bite - that's all it took to get me dumpling crazed.

I've omitted pasta from this soup recipe because of the floating bread balls - but you could forgo dumplingville and stick some elbows, orzos, rotini, anything you'd like in there instead. Or even have both. Oh my.

NOTE: In honor of Ye Olde Top 9, I'm adding a Gluten Free dumpling recipe to this! Find it below the standard dumplings. They're very similar!

Winter Minestrone with Parmesan Dumplings


For the delicious stew: (makes 8-10 single servings)

1 large can chopped/crushed tomatoes
2 small cans tomato paste
2 zucchini, chopped
1 large red onion, chopped
10 cloves garlic, minced
2 tablespoons freshly minced parsley
3 tablespoons freshly minced chives
Tons of black pepper
1 large bunch kale, sliced to ribbons
6-8 baby carrots, chopped 
2 large ribs celery, chopped
1/2 cup good quality olive oil
1/2 cup bitey red wine
2 cans cannelini beans, well drained and rinsed (I dump them into a colander and rinse under the faucet)
1 can garbanzo beans, see above
1 red pepper, chopped
8 ozs mushrooms, chopped
Handful frozen green beans, chopped
1 tablespoon + more sea salt, to taste
10 cups water


For the (regular) dumplings:

1 cup high-gluten flour, like bread flour
2 garlic cloves, minced
1 scant tsp baking soda
1 tablespoon dried parsley
1 tablespoon dried chives or chervil
Freshly ground black pepper
1/3 cup finely grated Parmesan
1 egg
2 tablespoons butter, melted, mixed with 1/2 cup milk or water

I usually make my dumpling mix first, and chill it, giving it time to glue together a bit. So go ahead and mix your dry ingredients in a medium bowl, wet ingredients in another smaller bowl, make a well in the center of your flour mix, and while stirring if possible, add your wets to your dry, mixing until un-lumpy. Cover and set in the fridge.

If you're making GF dumplings: 

1 cup GF all purpose flour
1 scant tsp xantham gum
2 garlic cloves, minced
1 scant tsp baking soda
1 tablespoon dried parsley
1 tablespoon dried chives or chervil
Freshly ground black pepper
1/3 cup finely grated Parmesan
1 egg
2 tablespoons butter, melted, mixed with 1/2 cup milk or water

Follow the directions above and proceed with the directions below. They'll be slightly more dense, but deeeelicious!


In a large soup pot, add your olive oil. Over medium high heat, saute your garlic, onion, peppers, carrots and celery for 5 minutes, until onions are translucent. Add zucchini and mushroom - cook another 3 minutes, until mushrooms begin to soften. Add kale, stir, cook one minute more. Add your wine and turn heat to high for 2 minutes, until it has reduced a bit, then add water, tomatoes, tomato paste, beans including green, herbs, pepper, and salt, stir well, and bring to a simmer. Cover and cook 20 minutes, until all your lovely veggies have softened. (If adding pasta, add 15 minutes into your simmer). Taste. You'll probably need to add a little salt at this point - and maybe a dash of sugar to bring the sweetness of the green beans out - but it's totally up to you.

Now, I'm going to say it - it's almost always best to cook dumplings in the soup you're eating them with. They absorb all the awesome flavors you've been stewing up, and the only trade off is a little cloudiness/ spare floaters in your brew. Some dislike this and would rather cook them separately, in their own little pot of boiling water, and if you'd prefer, go right ahead.


Meanwhile in Julialand, it's time to dump those suckers on top of your stew, so grab your batter from the fridge, get a large, round spoon, moisten one hand, and while the soup is gently simmering, drop one spoonful of batter at a time onto the top of the soup, using your moist finger to push it off of the spoon. Quickly form the rest of the dumplings in this same way and cover your pot. Simmer 8-10 minutes, or until dumplings have just solidified in their middles.


To serve, ladle a chunk of dumpling into the middle of a bowl and spoon soup all around. A little extra grated cheese on top should do the trick. Ah yes, that feels lovely in the belly, doesn't it?


Cheers!
 

Wednesday, January 12, 2011

Wanton Wontons - take two

As awesome as the mini samosas were, I think I like this recipe better.

Mostly because it's a hearty soup and hell if Charlotte hasn't been completely laminated by snow and ice this week - also, because it's relatively healthy and has a full range of vitamins in every bowl - but mostly, because it contains cabbage, and I have the Cabbagewinter gene - when it's cold out, I want to eat copious amounts of it.

But where the samosas were cute - this stew most def is not. Erk commented while finishing his bowl - "Dude, it looks like we're eating tiny brains. Gross."


The man still managed to power through and inhale his rather large serving, so it can't look too bad, eh?

A couple of short comments on prep - because I really want you guys to give this one a whirl, but there were several frustrating moments for me:

Wonton construction: like the samosas, we're going to fold these over corner to corner, but then take the extra step of folding the two corners of the long edge together, making a nurse's hat. This makes these denser, more dumpling-like, instead of floppy-ravioli-ish.

Burp the wontons of air as you construct, or you'll end up with little soup mines that'll explode as the air inside them heats. Yowza.

Make these RIGHT BEFORE cooking them. Wonton wrappers are super sticky. They don't do well on a plate in the fridge overnight.

Cook them all at once in the pot with the soup, stirring gently but constantly to keep them separated. They might clump up a little bit with the cabbage et all, but trust me, if you cook them by themselves in boiling water, they're like little magnets, and find each other, clump up, forming one large mass of dumpling. Delish, but individual pockets of yum are waaay more fun. And easier to serve.

Ok. Hope I didn't scare anyone with that description of cooking fail. There's lots of it in my kitchen ;) Also, you guys know by now there's no real sausage in this recipe - but you could totally use pork to great success if that's how you roll!


Sausage Wontons with Cabbage, Carrot, and Pea Stew

20 wonton wrappers
10 ozs vegetarian sausage, cooked, minced

2 tablespoons butter
1 small head cabbage, peeled of its first layer, then sliced thin
1 medium onion, minced
4 medium carrots, peeled, chopped
Tons of black pepper, at the beginning and end of stewing
Parsley, 1 tblspoon, minced plus 1 tsp reserved
Vegetable broth, 10 cups or:
1/2 cup tamari soy sauce, 2 tablespoons nutritional yeast, 1 tablespoon miso mixed with 9 cups water (taste and salt/add more miso if needed) 
1 cup frozen peas


In a large soup pot, melt your butter. Add onion and carrot and cook 10 minutes, cover on, until carrot softens a bit.


Add cabbage, stir, cook 2 minutes. Add broth, parsley, black pepper. Bring to a simmer, cover, and cook, stirring occasionally, until cabbage is almost tender, about 45 minutes.


Meanwhile! Make your 'Tons. Like I described last time, I like to do this over the sink with a cutting board, wetting my fingers as needed to seal each wonton. So lay a wrapper out on your board and carefully wet around the edges. Pile about a tsp or tsp + 1/2 in the center of each wrapper and fold the corners together to make a triangle, making sure to work any air out as you go. Pick the wonton up and pull the two corners of the wonton's bottom together, pressing the edges together firmly, one on top of the other, to create a lopsided donut shape. Place on a dry plate and repeat until your filling is finished (I made it to 20-22).


Once your cabbage is fork-tender, it's about time to toss in the dumplings. Make sure there's a fair amount of liquid around the carrots and cabbage - add a little more water if needed and taste for salt. Carefully drop the dumplings in, stirring to make room for more, and cook, covered, 3 minutes. Remove from heat, uncover, add peas, and let coo1 5 minutes. 


Ladle 4 dumplings into a bowl and cover with soup. I thoroughly enjoyed mine - I hope it gets your tummy all warm and cozy too. The next day, the dumplings had fallen apart a bit - but this was just fine, as it distributed the chewy pasta and faux-sausage throughout. Yum.

Thursday, December 30, 2010

Decadent Broccoli Cheese Chowder

I loved Broccoli and Cheese so much that as a kid, I dressed up as it for Halloween. I'm serious.

Over the years my passion has mellowed a bit, but I'm still the one nibbling at the last couple of florets on Fondue Night and I just about lost it when I found out Gramma had made Broccoli Cheese Casserole (in all its mayonnaise-drenched, condensed soup goodness) for Christmas Dinner. Yeah, I ate some of what I cooked - but at least as much BCC went down the hatch.


Since I cook for a couple of gluten-free women, I wanted to try different thickeners, instead of flour - cornstarch seemed an obvious choice, but maybe I could minimize the starch by using goat cheese and extra potato?

Yes I can, and did, and I gotta say - best B+C Chowder ever made by Moi.


Broccoli Cheese Chowder

1 small head brocolli
2 medium yukon gold potatoes, peeled and diced largishly (my pieces were all about 1/2 inch wide)
1 small onion
2 carrots
2 stalks celery
4 cloves garlic, minced
3 scallions, minced
Small handful parsley, minced
1 cup milk or cream
2 tablespoons butter
4 ozs fresh goat cheese
A rather large amount of freshly grated black pepper
Salt to taste
6 cups vegetable stock or water and boullion equivalent
3/4 pound sharp cheddar cheese, grated, tossed with 1 tablespoon cornstarch
1 tsp mustard
1 tsp lemon juice
Scallions, shredded cheddar, hot sauce or Jalapeno Oil to garnish (recipe for Jalapeno Oil at page bottom!)

Let's do this.

Melt your butter in a medium stock pot and add onion, celery, carrot, garlic. Over medium high heat, stir veggies every 2 minutes while keeping pot covered until they soften, about 6 minutes. Covering the pot in between stirs helps to steam the veggies, thus quickening their cooking time.

Add your brocc, stir, cover once more and cook 2 minutes, until it has turned bright green. Add stock, potatoes, scallions, parsley, pepper, mustard and lemon juice, and simmer soup for 10-12 minutes, until potatoes are very soft. Remove from heat.

Use an immersion blender to carefully blend your soup to the desired consistency - I went for pretty well-blended with some large chunks for kicks. Return to the heat and add your cream, cheddar, and goat cheese. Stir well and let it all melt and blend. Taste for salt and add, if needed.


Sprinkle any remaining cheddar over the top along with parsley or scallions, and serve. If you want a little heat, try the Jalapeno Oil described below. Nom.

Jalapeno Oil


1 large jalapeno
1/2 cup flavorful olive oil
Parsley, scallions, garlic, whatever herb strikes your fancy

Put it all in a blender and whizzzzzz until everything's emulsified. Strain through cheesecloth or a fine-mesh sieve. Serve.

Tuesday, December 28, 2010

...and a Partridge in a Pear Tree.

It's funny how entwined food is in my family's holiday traditions. Sometimes, I think it's all my fault.

We aren't Thanksgiving people. We aren't even Christmas people. We're remarkably a-religious - whatever it is we're celebrating when we get together around my ma's big, wooden dining table, it's totally secular. Maybe that's why Fondue Christmas Eve is such a big deal. And it's definitely why I take cooking on Christmas Day so seriously. Like, unwrap the prezzies, have a nibble, and get to work seriously. Part of it is that I have some reluctantly vegetarian relatives, and converting them, even for one night, is a challenge.

This year was made awesomer by Sous Chef Erk playing such a big role. First meal we've conquered together, start to finish. I love that guy.

So, some hot pics:


My ma set up a table in the "studio" complete with multiple light sources and cute, formerly-Guatemalan-wall-hanging placemats for a quick shot before we dug in. Awesomemom.


Yeah, we partied like it was 1974. This was fo sho' an anti-minimalist spread - 7 separately prepared items on one plate, swimming in Bourbon-Fennel Ragu. Tasty, but intense. Counter-clockwise: Lemon-Thyme Roasted Fingerlings, Garlic Braised Baby Bok Choy and Pea Shoots, Pickled Green Tomatoes, Bourbon Ragu, Smoked Cheese Grits, Whipped Honey-Butter. We did some biscuits, too, to go with the extra butter.

The base was kind of a combination of these two meals - savory, cheesy, buttery grits topped by a thin, brothy sauce with a lot of oomph. Those were two of my favorite meals from this year, so I wanted to show it off to the fam. And anything is improved by spooning it over a pillow of hot grits. Of course, in the grit cake recipe, you chill the grits so that you can shape them - but they're just as amazing fresh out of the pot.

And then there was the Maple-Pecan Crusted Tempeh on top.

1 cake tempeh (enough to feed 2)
2 tablespoons maple syrup
2 tablespoons butter
1 tsp mushroom stock concentrate or 2 tsp soy sauce
Lots of freshly ground black pepper
Dash smoked salt (or regular)
1 clove garlic, crushed, then minced
2 tablespoons crushed Pecans

Toast your pecans in a dry skillet for 2 minutes, tossing, until nicely browned and fragrant. Set aside.

Mix syrup, stock or soy sauce, salt, garlic, and pepper in a measuring cup.

Boil water in a large, wide stock pot. Set a colander over the pot and place your tempeh, sliced to fit, if necessary, in the colander. Cover with a lid and towel and steam for 10 minutes, flipping once.

Melt butter in a iron skillet and press tempeh into butter. Sear for 2 minutes on each side over medium-high heat. Add your syrup mixture and cook 1-1.5 minutes, then flip the cake, coating the other side with the syrup as well, and continue to cook, flipping, until both sides have a nicely browned crust.

Press your pecans onto the seared tempeh, using enough pressure to get them to adhere. Slice and serve.


 The leathery, deeply smokey ragu complimented the maple and pecan flavors nicely, methinks. Give it a whirl, and let me know how it goes!


ALSO! If you'd like to brag about the delicious nosh you and yours ete over the Holidays, you know I'd love to hear all about it.

Sunday, December 5, 2010

Chilicrown - better than a trophy.

Dunno if I've told you guys some key things about me:

I like to Yelp stuff. Fits into my whole "small businesses rule" paradigm.
I went to art school. Thus, I make a lot of odd things.
I get a little competitive about cookoffs.

So when a Yelpbud decided to have a Chili Cookoff a couple months back, wheels started turning. Not about what I was going to cook, mind you, but about what I could make, for cheap, to award to the winners. Cuz yeah, I claimed that responsibility early and gleefully.

Since our Latino markets are SO AWESOME here, I knew I could get dried chilis for cheeeeeeap. And a certain sister o' mine brought me some kickass gold spray paint, so some lucky peppers were going to get goldfingered. And the others would get varnished, so no one would fry their eyeballs out after putting on their Chilimedal.

So we ended up with several ridiculous chili wearables:


Obviously a crown was essential. Ah, hot glue and cheap christmas tinsel, I love yee.


"Medals" for 2nd and 3rd place. These I like alright, but wasn't super happy with. They were fragile, as well. Must have been Italian.


My fav had to be the honorable mention boutonnieres - they were rad. So cute, in fact, I took multiple shots of them.


I'd recently made a TON of boutonnieres for our wedding, so I had all kinds of floral tape, millenary flowers, etc, with which to craft these babies. Add some tinsel and chilis, and ya, they were awesome.


Less than 15 bucks, the whole shebang. And to be honest, I spent more time on the "trophies" than I did my chili. But onto the important part of this post:


This is one of my classic recipes. I've been making chili this way for a long time (although I did experiment a little bit this time, see below), and have tweaked the flavors 'till it sings (to us, that is). One difference - I really wanted to try some different beans this chili go-round, so I bought Canarys and Central American Reds to go with the ubiquitous Blacks. They were gorgeous dried.

I also used fresh tomatoes, which, I'm pretty sure, I'd never done before. Honestly, I don't think it was worth it in the end - there tends to be soooo much else going on in a good bowl of chili that the fresh, tart, green taste of fresh tomatoes gets lost. But in case you want to give it a whirl, I'm including them in the recipe below.

3 Bean and Vegetable Chili
serves 10

For the chili:
8 pounds fresh roma tomatoes (or 3 28oz cans chopped tomatoes)
2 tablespoons sundried tomatoes in oil
6 chipotle chilis in adobo, deseeded
2 tablespoons adobo from chipotles 
4 dried ancho chilis, deseeded
2 stalks celery, diced
2 green peppers, diced
20 cloves garlic, minced
1 large red onion, diced
1 bottle dark beer or stout
2 ozs dark chocolate
3 tablespoons molasses
2 tablespoons rich vegetable stock concentrate
1 small can tomato paste
2 tablespoons cumin
1 tablespoon Mexican oregano, rubbed

For the beans:
1/2 cup each dried Central American Red, Black, and Canary Beans, rinsed
1/2 onion, sliced
3 bay leaves
6 cloves garlic, whole
6 cups water
2 tablespoons rich vegetable stock concentrate

Additional ingredients:
 4 tablespoons strong-tasting olive oil
4 tablespoons butter
3 medium calabaza squash, quartered and chopped
1 pound mushrooms, destemmed and quartered
1 cup TVP (optional)

Let's do this, shall we?

This recipe happens both on the stove and in the Crock Pot. To begin, rinse your beans well and put them and all of the other "bean" ingredients in your pot and stew, on high, for 2 hours. They'll soften a bit, but will still be crumbly when you break their skin. this is what we want. Remove bay leaves and whole garlic cloves. Keep them warm in the Crock.

Boil 3 cups of water in a small sauce pot. Add your Anchos and let steep 20 minutes.

Peel and seed your tomatoes, but when seeding, do it in a strainer over a bowl so you don't miss out on any of the nummy tomato juice. Roughly chop and set aside.

In a blender, puree your garlic with 1 tablespoon of your olive oil.

In a large stew pot, melt your butter over medium-high heat and add the additional olive oil. Add your garlic, pepper, onion, and saute over medium heat 8-10 minutes. Add your mushrooms and calabaza and cook 8 minutes more.

Meanwhile, without cleaning the blender, put your soaked Anchos, your deseeded Chipotles, the 6 stewed  garlic cloves, and your sun dried tomatoes - puree until they're a thick paste.

In a dry skillet, toast your cumin over low heat until it browns slightly and is aromatic as all hell.

Pour the beer into the peppers/garlic/onion and turn heat to high - simmer 2 minutes to mellow. Add tomatoes, cumin, chili paste, vegetable stock, chocolate, reserved tomato juice, molasses and oregano. Simmer 20 minutes, until calabaza is softish and tomatoes start to break down.

Move the operation to your Crock Pot with the beans at this point - just empty the contents of your pot into the Crock. If it looks like it won't all fit, ladle some beans out and fill to about 1 cm beneath the ridge.


Add your TVP and mix well. Cook 4-6 hours on low heat until beans are soft but still have a slight bite. Adjust heat by adding more adobo (from the chipotles) if necessary, and adjust salt by stirring in a small amount of stock concentrate, if needed. I also like to add a last tablespoon of pureed garlic during the last hour to punch it up a bit.


Robust, smokey, sweet but salty. And spicy. Perfect topped by sharp cheddar and a little sour cream.

Other delish chilis were sampled with relish and abandon:


There were only 3 us veggies could munch there, but I dispatched multiple bowls with dexterity and determination.

Thanks to poprock photography for this nerdy shot.


And hey, guess what? I got to take home the crown. Hehe.